Backlighting tips.......
Sorry for the delay....I'm sure you guys know how I work by now! LOL!! =) OK...let's get started. I'm posting my SOOC shot first...it's not awesome but when I look through them, I pick out the ones that are workable. In full size it didn't look this hazy, but when I resized for web, it looks a bit wonky. =)
My settings were:
ss 1/160
1.8
ISO 400

What I did was set my camera to partial metering which is best for extreme contrasts and lighting differences. I metered off my carpet because it's a nice brownish color but I also meter off her face sometimes or use a gray card. I purposely underexpose my photos because I don't want to blow out Gracie's hair or in this case her hat. I picked my focal point which was the center one (with partial metering you only have the little circle in your viewfinder to work with).
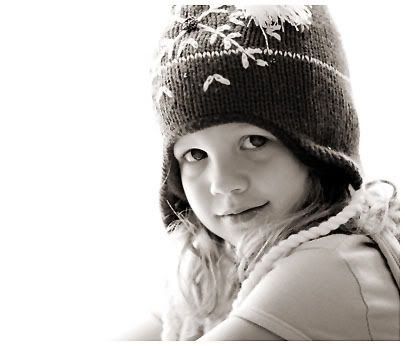
As far as the PP....I did my normal steps when I convert to b/w
- bumped up levels
- ran my action...I wanted to keep it more moody so my color burn layer was at40%
- I played a bit more with contrast than I normally do with this one....I think I had it at +7
- clicked on hue/sat and bumped up the middle slider to +15
- cropped
- despeckled
- USM of 100, 0.3, 0. I should have erased back her stray hairs because they really stand out but I'm to lazy to do it....this is a just for fun photo. =)
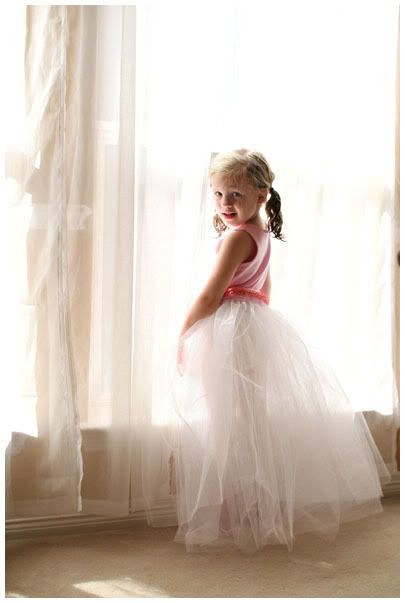
Here's another before and after and the SOOC is a bit better than the first one. As far as my PP, I just ran my action, cropped and did a USM of 100, 0.2, 0...it took all of 15 seconds....gotta love that. =)

My settings were:
ss 1/160
1.8
ISO 400
What I did was set my camera to partial metering which is best for extreme contrasts and lighting differences. I metered off my carpet because it's a nice brownish color but I also meter off her face sometimes or use a gray card. I purposely underexpose my photos because I don't want to blow out Gracie's hair or in this case her hat. I picked my focal point which was the center one (with partial metering you only have the little circle in your viewfinder to work with).
As far as the PP....I did my normal steps when I convert to b/w
- bumped up levels
- ran my action...I wanted to keep it more moody so my color burn layer was at40%
- I played a bit more with contrast than I normally do with this one....I think I had it at +7
- clicked on hue/sat and bumped up the middle slider to +15
- cropped
- despeckled
- USM of 100, 0.3, 0. I should have erased back her stray hairs because they really stand out but I'm to lazy to do it....this is a just for fun photo. =)
Here's another before and after and the SOOC is a bit better than the first one. As far as my PP, I just ran my action, cropped and did a USM of 100, 0.2, 0...it took all of 15 seconds....gotta love that. =)
posted by Brenda at 8:08 AM
![]()
14 Comments:
Woo hoo! thank you for sharing this! I'll have a stab at it -- although I'm sure I'll need to take A LOT to get results even half this good!
Paula
Brenda,
I can hardly wait to give this a try. Thanks for taking time out of your busy schedule to pass along your techniques. I always love the feel of your photos.
Janet
I know what I'm gonna do this weekend!!!!
Thanks!
Beautiful! I love your backlighting! What action do you use for your black and white pictures?
YIPEE!! Thanks so much for sharing this info. I can't wait to play this weekend.
Do you have an action available for your black/white conversion? I have the steps from when you posted on 2Peas, but an action would be even better!
I am so excited to try this! I think it might be addicting! Thanks for shareing!
Thanks Brenda, your the best!
I have attempted backlighting twice with no luck... I am going to follow your directions more closely and hopefully I will get it this time!
One of the above posters said you posted the steps to a b/w conversion on 2peas. could you post them on here too?? I love your backlighting and I am going to try it this weekend!
wow, thanks. Off to convince the kids to let me play :)
Thank you so much for sharing your techniques. Can you explain how you "resized" your photo for the web? I love the customization of your Blogspot - is there a book, etc you can recomend for how to do that? Especially getting your photos to look so BIG.
Thanks, Eleni
Wahoo! Maybe I"ll actually get something worth keeping now. You know how I've struggled with this. Can't wait to give it a try. Now I just need some sunlight.
Thanks so much Brenda for sharing these tips!!!! I love your BL'ing. Love that 3rd one in color too!!
very cool. I have worked a bit with backlighting, but now i live in a cave and i'm struggling getting all that light. ARG!! Thanks for you tips.
You guys are so welcome....anytime! =)
Lauren and Amy,
With those...I used my action. I've got it linked so you can download it. =)
Eleni,
What I do is go to Image Size and I set my dpi at 72 and I set my width at 350 pixels (it will automatically change the height for you). Then I go to Canvas and I change the drop-down menu to pixels and I change my width to 400 pixels and add 50 pixels to my height. Then I run a USM. I upload to Photobucket (it's free) and I copy the second html (I think it's IMAGE, but not for sure). I then go to New post on blogger and I type what I want and I just paste the html in with everything....I don't download my photos. If you click on compose, the pictures will show up in your post....it allows me to make my photos bigger because they are way to small from blogger. =)
No problem Tiffany! =)
Thanks everyone....you all ROCK! =)
Post a Comment
<< Home